|
神经网络能学会辨识随手画的灵魂涂鸦吗?只要数据够多就可以! 今天想带大家从零开始实现一个谷歌开发的小游戏 —— Quick, Draw! 或是叫“限时涂鸦”! 点击打开链接 (谷歌所有,需科学上网…)
在本文将涉及到以下内容: - 准备数据
- 训练用于图片分类的神经网络(Caffe)
- Python实现
- 移植树莓派
- 神经网络移植于Intel Movidius 芯片的一款嵌入式智能硬件,弥补树莓派计算力不足

游戏内容很简单也很有趣:给你20秒的时间和一个题目,在时间限制内画出来并让AI正确识别。

本灵魂画手的杰作。还没画完就已经被识别过关了于是变成了这样的半成品… 似乎大家的水平看起来都差不多。
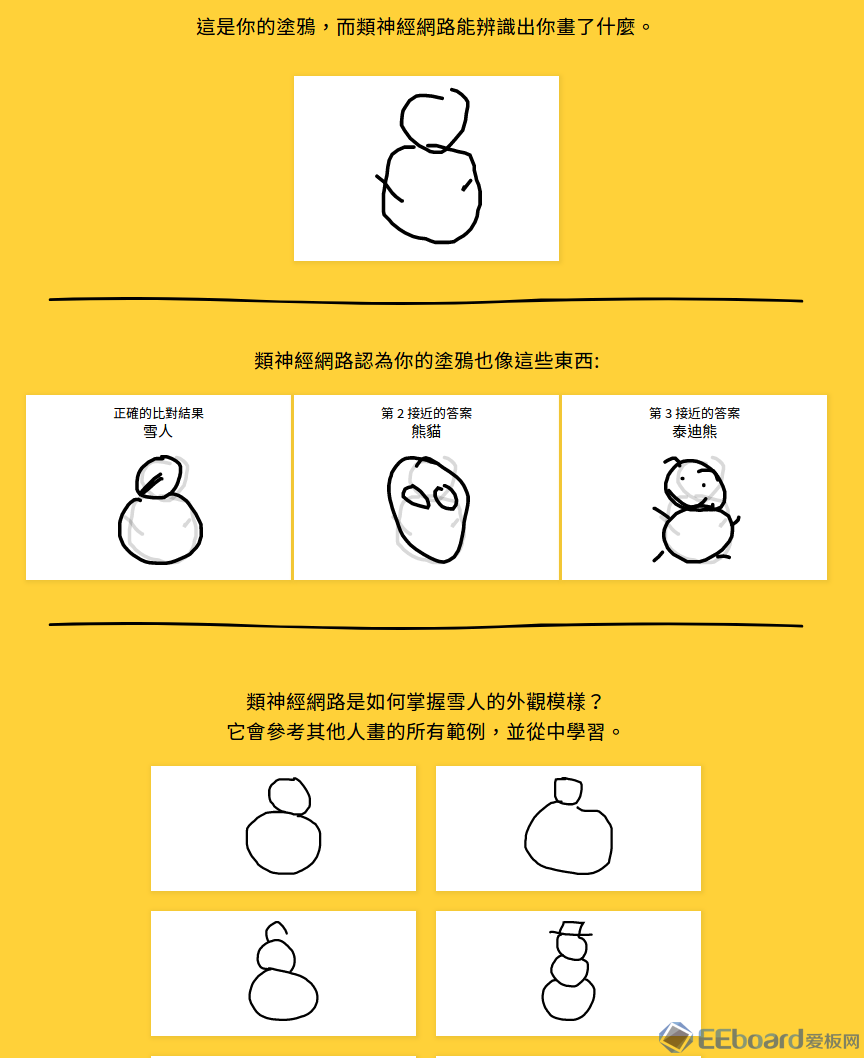
好了,言归正传,首先让我们来分析一下整个游戏的逻辑,然后分成小模块一个一个来攻破。
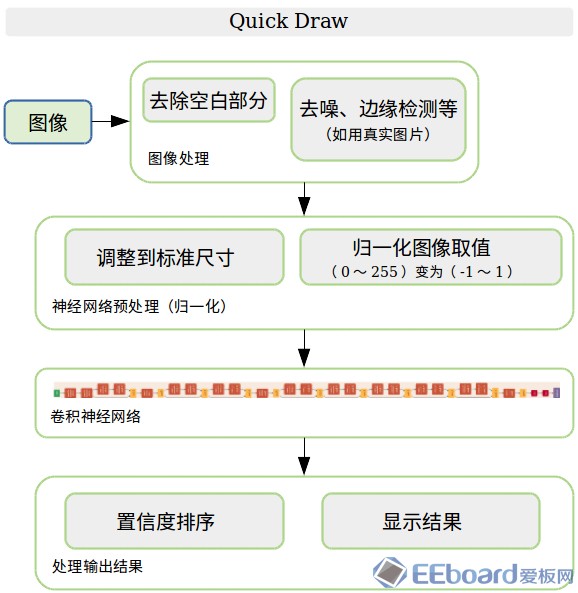
我们先从核心的部分开始:如何训练卷积神经网络来识别涂鸦。
获得图像数据和标签 之所以谷歌的这个小游戏可以神奇地正确识别各位在座大触们的作品,原因就是大家玩这个游戏时所提供的海量的数据。 猜猜现在已经有多少个了? What do 50 million drawings look like?
Over 15 million players have contributed millions of drawings playing Quick, Draw! These doodles are a unique data set that can help developers train new neural networks, help researchers see patterns in how people around the world draw, and help artists create things we haven’t begun to think of. That’s why we’re open-sourcing them, for anyone to play with.
1500万玩家提供了345类共5000万张图片!你无论怎么画,总是有那么几个人和你思路差不多,这就是大数据的力量。
可喜可贺的是良心的谷歌开源了这个数据库,并且提供了一个相比于图像识别更高端一些的识别方式教程,如果有兴趣的同学可以->(通过笔顺用RNN在Tensorflow上实现)。
谷歌将数据存在了他们的云服务器上(Google Cloud),同样需要科学上网和谷歌账户才能下载,下载较为繁琐(如需下载全数据库请参考他们的Github)。
于是我重新整理了一个轻量级(其实也有100万张)的数据库用于方便大家使用,包括(机翻的)中文标签。剩下的训练用网络结构、指令、模型也放在了里面。 链接: https://pan.baidu.com/s/1C5iENo6y8QijXMxOXDFIfw 密码: fgm9
安装OpenCV,安装Caffe,这两步可以很简单也可能让人抓狂好几天… 首先最好电脑上有支持Cuda的nvidia的显卡,没有也行,只是CPU训练远比GPU慢的多。具体安装过程就不赘述了,网上有成吨的教程。提供一下官方Caffe的Github链接。 注意编译PyCaffe!
好了,一切准备工作就绪,可以开始训练了。 (注意:我使用的系统是Ubuntu 16.04,其他操作系统可能有略微不同,如果哪里有坑欢迎大家补充交流)
训练第一步:生成LMDB数据库
Caffe支持用txt, hdf5以及lmdb格式训练,生成难度依次从低到高,但效率也同样从低到高。因为我们的数据姑且也是百万级的,所以在这里选择用LMDB格式。好在Caffe自己提供了方便的工具可以直接生成LMDB格式文件,只需要调用编译好的二进制convert_imageset 即可。
以下为全部指令: - [Caffe路径]/convert_imageset --resize_height=28 --resize_width=28 [数据根目录] ./label_list.txt ./train_lmdb
- [Caffe路径]/convert_imageset --resize_height=28 --resize_width=28 [数据根目录] ./label_list_test.txt ./test_lmdb
在这里需要label_list.txt来指定图像数据的位置以及它的类别标签,比如说其中一行: - /images_test/0000/00046005.png 0
将0000文件夹的图片赋予标签0, 注意标签要从0开始依次往下排,不然Caffe会出错。 list我已经生成好了放在了网盘里,如果想用自己的数据训练类似问题可以参考这个结构在Python用os.walk来遍历生成。
训练第二步:Caffe指令 - [Caffe路径]/build/tools/caffe train --solver=./solver.prototxt --gpu 0 2>&1 | tee ./log.log
这一步将开始训练,其中solver是用来设定配置文件以及其他训练时所需的参数。例如我使用的如下: - net: "./train.prototxt"
- test_iter: 1500
- test_interval: 500
-
- base_lr: 0.01
- lr_policy: "multistep"
- gamma: 0.1
-
- stepvalue: 20000
- stepvalue: 45000
- stepvalue: 65000
- stepvalue: 300000
- max_iter: 1000000
-
- display: 200
- momentum: 0.9
- weight_decay: 0.0005
- snapshot: 20000
- snapshot_prefix: "./models/sketch"
-
- solver_mode: GPU
如果没有GPU可以将最后改为CPU,并且降低max_iter以及上面学习率迭代次数相关的参数。snapshot_prefix指定模型存放路径,小心两点:这个是前缀,所以会生成 sketch_iter_xxxxxxx.caffemodel 另外记得要事先生成文件夹。 其他参数的含义也可在成吨的Caffe教程里找到详细解释。
指令中--gpu 0 为指定跑在第几个GPU,使用CPU的话可先改solver然后删掉-gpu即可。之后的部分将Console输出的日志全部写进.log文件里, Caffe提供了一个Python脚本可以筛读这个log文件画图。
Loss 与迭代次数的关系图: - python [Caffe路径]/tools/extra/plot_training_log.py 6 ./log.png ./log.log
训练正常开始的话,可以留意一下training loss和test accuracy的变化。 我的如下,其实loss稳定长期不变了就可以关了省电。

因为输入图片很小 24x24,所以迭代次数应该非常快(假设GPU),大概半小时到一小时左右模型就可以正常使用了(视测试准确率而定)。 【趁训练终于可以合法看一波动画或是打一局游戏了……】
Python实现第一步:用测试图片在Python中验证模型是否正确 休息归来,模型训练的差不多了,终于可以在Python中试验一番。 首先是测试PyCaffe是否可以正常工作。如出现以下问题请先将Caffe路径加入Python的搜索路径中。 - >>> import caffe
- Traceback (most recent call last):
- File "<stdin>", line 1, in <module>
- ImportError: No module named caffe
添加Caffe路径: - >>> import sys
- >>> sys.path.append('[Caffe路径]/caffe/python')
- >>> import caffe
- >>> caffe
- <module 'caffe' from '/home/vlab/SSD_Proj/caffe/python/caffe/__init__.pyc'
载入Caffe模型,会哗啦啦出一大片日志。 - >>> net = caffe.Net('./deploy.prototxt', './deploy.caffemodel', caffe.TEST)
Caffe没问题的话,可以开始随便载入一张小图片来试验一下了: 我们来随便照一张图:
 看起来是个扫把……
 - >>> import cv2, numpy as np
- >>> img = cv2.imread('./test.png')
- >>> img = (img.astype(np.float)-127.5)/127.5
这里用OpenCV读了图,并且归一化图像取值,因为图片本身就是24x24所以不需要cv2.resize来调整大小。
接下来就是转化图像矩阵变为Caffe需要的格式,此处经常会出错一定要小心。Caffe为(1, 3, 24, 24),图像为(24, 24, 3)。['softmax']为最后输出层名字。 - >>> img_caffe = np.array([img]).transpose(0,3,1,2)
- >>> out = net.forward_all(**{net.inputs[0]: img_caffe})['softmax']
out 为长度345的向量,每一维代表着对于每一个类别的置信度。来看一下最大的概率是哪个 被认为ID=73的置信度有0.888,那应该是相当的肯定了,让我们看一下73号是什么: 还是看一下英文的好了… 虽说不是扫把,不过看起来确实是对的! 好,最重要的一步做完了,剩下就是实现小游戏了。
Python实现第二步:PyGame
游戏规则是只要画的东西被识别排在前5名就正确。我决定用PyGame来实现这个游戏,或是说用Python的话目前能想到比较适合的只有这个了… (安装在Ubuntu的话可以用pip install pygame)
先看看效果,在这个小窗里画一个城墙。(虽说题目要求我画盆栽)
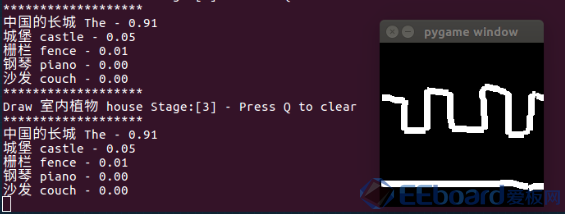
看起来没问题。
整个Demo逻辑上比较简单,PyGame窗口上画线然后每一帧抽取出图像输入进神经网络识别,最后排名输出结果。
还是用代码说话: - #coding: utf-8
- import pygame, random
- import cv2, numpy as np, sys, pdb
-
- sys.path.append('./caffe/python') # <- Caffe path
- import caffe
-
- size = 200
- rz = 28.0
- ratio = rz/size
-
- draw_on = False
- last_pos = (0, 0)
- color = (255, 255, 255)
- radius = 8
-
- caffe.set_device(0)
- caffe.set_mode_gpu()
- net = caffe.Net('./deploy.prototxt', './deploy.caffemodel', caffe.TEST)
-
- fcl2 = open('./class_list.txt','r')
- fcl = open('./class_list_chn.txt','r')
- class_list = fcl.readlines()
- class_list_eng = fcl2.readlines()
- cls = []
-
- for line in class_list:
- cls.append(line.split(' ')[0])
-
- screen = pygame.display.set_mode((size,size))
-
- def roundline(srf, color, start, end, radius=1):
- pygame.draw.line(srf, color, start, end, radius)
-
- try:
- pts = []
- stage = 0
- while True:
- e = pygame.event.wait()
- if e.type == pygame.QUIT:
- raise StopIteration
- if e.type == pygame.MOUSEBUTTONDOWN:
- draw_on = True
- if e.type == pygame.MOUSEBUTTONUP:
- draw_on = False
- if e.type == pygame.MOUSEMOTION:
- if draw_on:
- pts = roundline(screen, color, e.pos, last_pos, radius)
- last_pos = e.pos
- if e.type == pygame.KEYDOWN:
- if e.key == ord('q'):
- screen.fill((0,0,0))
- data = pygame.image.tostring(screen, 'RGB')
- img = np.fromstring(data, np.uint8).reshape(size,size,3)
- img = cv2.resize(img,(28,28)).astype(float)/127.5-1
-
- img_caffe = np.array([img]).transpose(0, 3, 1, 2)
- in_ = net.inputs[0]
- net.forward_all(**{in_: img_caffe})
- res = net.blobs['softmax'].data[0].copy()
- res_label = np.argsort(res)[::-1][:5]
- print('*******************')
- chn = ''.join([i for i in cls[stage][:-1] if not i.isdigit()])
- print('Draw %010s %s Stage:[%d] - Press Q to clear' % (chn, class_list_eng[stage].split(' ')[0], stage+1))
- print('*******************')
- for label in res_label:
- chn = ''.join([i for i in cls[label][:-1] if not i.isdigit()])
- print( '%s %s - %2.2f' % (chn,class_list_eng[label].split(' ')[0],res[label]))
- if label == stage:
- print('Congratulations! Stage pass [%d]' % stage)
- stage += 1
- pygame.display.flip()
-
- except StopIteration:
- pass
-
- pygame.quit()
Python实现第三步:摄像头 + 真·手绘识别
相信大部分人还是比起鼠标更喜欢用铅笔画,于是在此之上又做了一个新的扩展:用摄像头来识别白纸上的手绘去识别! 整体逻辑是这样:
在摄像头输出画面中间画一个小框 把需要识别的手绘放在小框里 利用图像处理方式抽取小框中的线条,使之变为类似数据库里的图片(黑底白线) 剩下的和之前一样 先上效果:
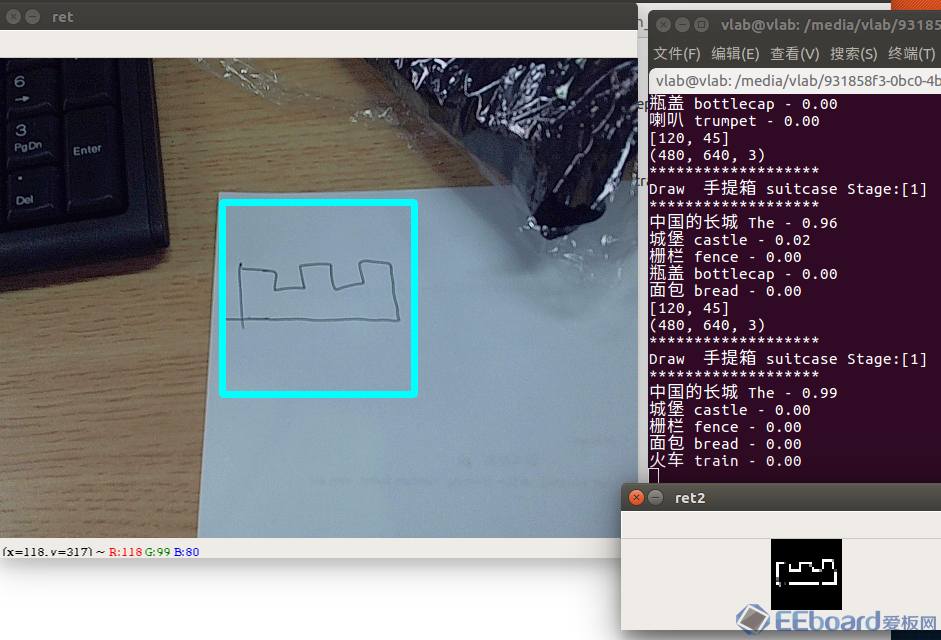
不错,0.99比之前用鼠标画的还高。 再上代码: - #coding: utf-8
- import pygame, random
- import cv2, numpy as np, sys, pdb
-
- sys.path.append('/home/vlab/SSD_Proj/caffe/python')
- import caffe
-
- size = 200
- rz = 28.0
- ratio = rz/size
-
- draw_on = False
- last_pos = (0, 0)
- color = (255, 255, 255)
- radius = 8
-
- caffe.set_device(0)
- caffe.set_mode_gpu()
- net = caffe.Net('./deploy.prototxt', './deploy.caffemodel', caffe.TEST)
-
- fcl2 = open('./class_list.txt','r')
- fcl = open('./class_list_chn.txt','r')
- class_list = fcl.readlines()
- class_list_eng = fcl2.readlines()
- cls = []
-
- for line in class_list:
- cls.append(line.split(' ')[0])
-
- cap = cv2.VideoCapture(0)
- p1 = 120
- p2 = 45
- ROI_ratio = 0.2
- stage = 0
- while 1:
- ret_val, input_image = cap.read()
- sz = input_image.shape
- cx = sz[0]/2
- cy = sz[1]/2
- ROI = int(sz[0]*ROI_ratio)
- edges = cv2.Canny(input_image,p1,p2)
- edges = cv2.cvtColor(edges,cv2.COLOR_GRAY2RGB)
- print(edges.shape)
- cropped = edges[cx-ROI:cx+ROI,cy-ROI:cy+ROI,:]
-
- kernel = np.ones((4,4),np.uint8)
- cropped = cv2.dilate(cropped,kernel,iterations = 1)
- cropped = cv2.resize(cropped,(28,28))/127.5 - 1
-
- img_caffe = np.array([cropped]).transpose(0, 3, 1, 2)
- in_ = net.inputs[0]
- net.forward_all(**{in_: img_caffe})
- res = net.blobs['softmax'].data[0].copy()
- res_label = np.argsort(res)[::-1][:5]
- print('*******************')
- chn = ''.join([i for i in cls[stage][:-1] if not i.isdigit()])
- print('Draw %010s %s Stage:[%d]' % (chn, class_list_eng[stage].split(' ')[0], stage+1))
- print('*******************')
- for label in res_label:
- chn = ''.join([i for i in cls[label][:-1] if not i.isdigit()])
- print( '%s %s - %2.2f' % (chn,class_list_eng[label].split(' ')[0],res[label]))
- if label == stage:
- print('Congratulations! Stage pass [%d]' % stage)
- stage += 1
-
- cv2.rectangle(input_image, (cy-ROI, cx-ROI), (cy+ROI, cx+ROI),(255,255,0), 5)
- cv2.imshow('ret',input_image)
- cv2.imshow('ret2',cropped)
- key = cv2.waitKey(1)
- if key == ord('w'):
- p1 += 5
- elif key == ord('s'):
- p1 -= 5
- elif key == ord('e'):
- p2 += 5
- elif key == ord('d'):
- p2 -= 5
- elif key == ord('r'):
- ROI_ratio += 0.1
- elif key == ord('f'):
- ROI_ratio -= 0.1
- print([p1,p2])
关于部分的图像处理算法: - 边缘检测使用了经典的Canny edge detector, 然后转回RGB的3个通道(虽说还是黑白,但因为训练时使用的是3通道)。
- 接着使用了大小为4x4的Dilate滤波器,用来加粗线条。
- 最后cv2.resize变成24x24即可
下面就可以开始移植到树莓派了。
为什么要移植树莓派呢?嵌入式开发除了挑战自我以外还有一个很大动机,就是摆脱笨重PC让算法跟着更轻便的主控放飞自我。毕竟在高达时代来临之前应该是不太可能见到可以背着大服务器满地跑的机器人了。
比如说一个家用助教机器人搭载了这个游戏就可以用来教小孩画画了……或是认识英文单词。
总之,让我们开始吧。
树莓派实现第一步...其实考过去装个Caffe/OpenCV的CPU版本就可以直接跑了。
但你发现事情并没这么简单,屏幕卡顿如同集成显卡吃鸡。目测大概帧率在2-3FPS吧。
作为搭载嵌入式Ubuntu系统的树莓派,真正难题比起兼容性更多是计算力不足。实际上就算是当代顶配CPU也跑不动大部分神经网络。
所以我借助了一个轻便的USB神经计算硬件。英特尔官方的NCS (Neural Computing Stick)虽说同样满足要求,但NCS比较更新缓慢,似乎不太会在功能方面作出比较大的拓展,毕竟Intel的重点是开发并卖其中Movidius芯片。于是我选择一款迭代更快的同样基于Movidius芯片、国人开发的新产品,叫角蜂鸟(似乎目前只在Intel大学生竞赛里使用,还没正式开卖,买的时候已经降价到600不到了)。
角蜂鸟目前额外搭载一个树莓派摄像头,可以直接通过USB输出结果。
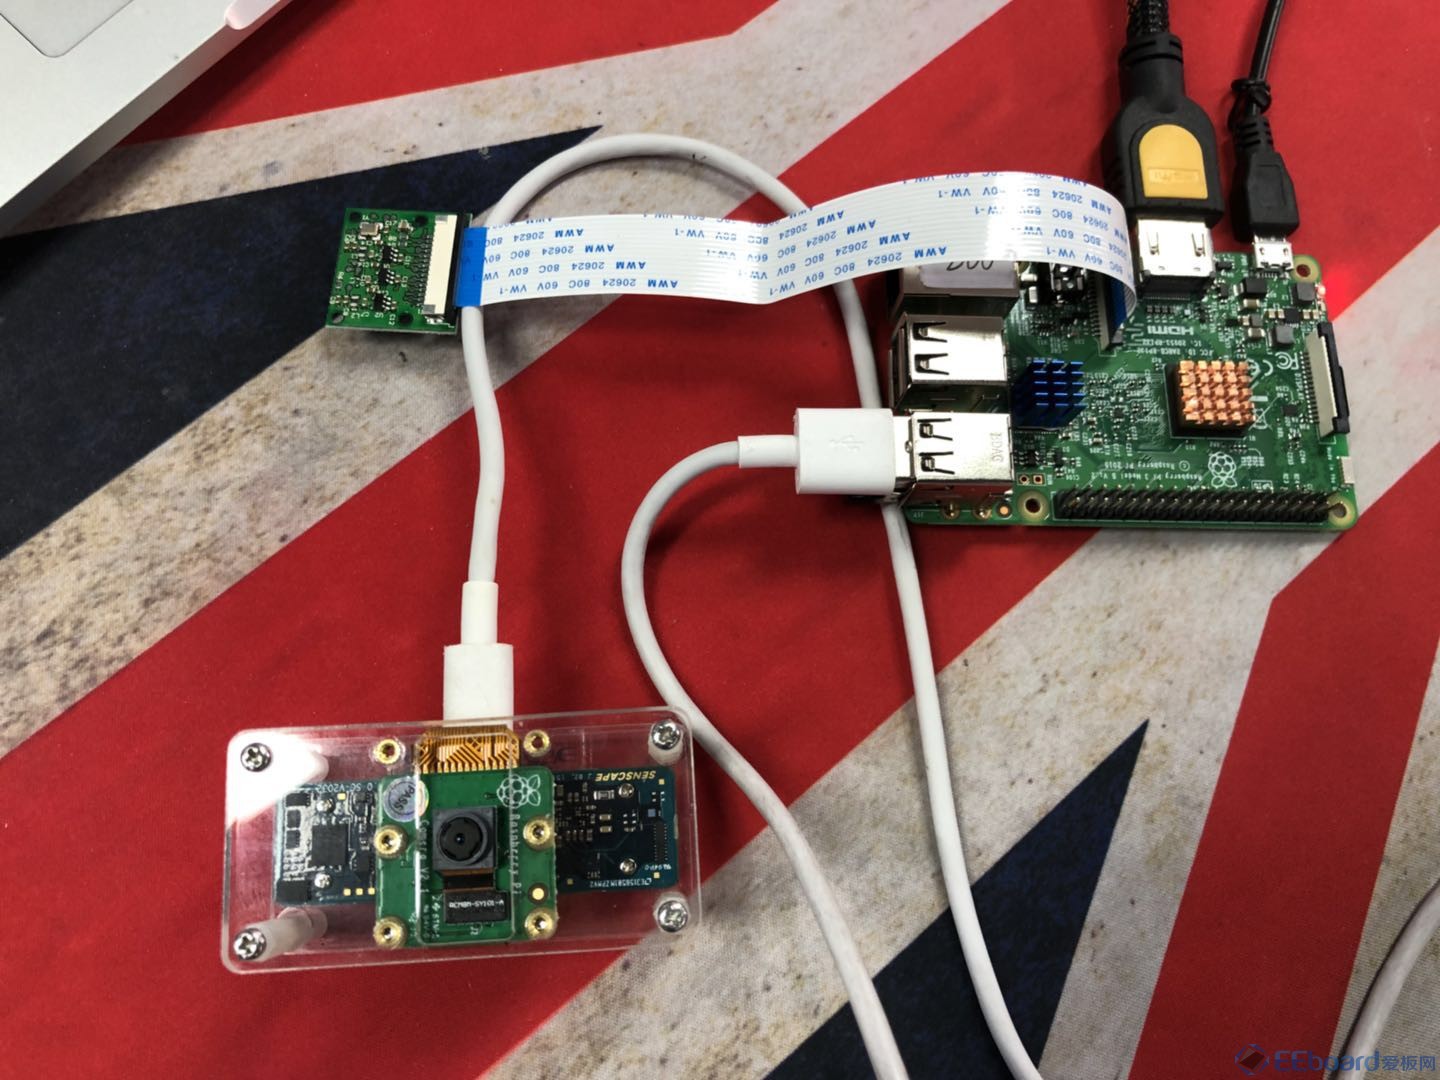
上面的是树莓派,下面的是角蜂鸟
树莓派实现第二步
按照说明安装角蜂鸟SDK之后就可以直接在Python调用了。
在使用之前需要做一次模型转换,将Caffe转为半精度的Graph文件。
这里直接把3个模式都整合了。不过目前角蜂鸟没法在内置摄像头和神经网络框架之间嵌入图像处理,只能通过外部取图再送回去重新识别,据说以后会开放更多功能。
加上了外接的神经网络计算硬件,树莓派顿时没了计算压力,基本可以实时地跑了。
总之,上代码:
- #coding: utf-8
-
- import pygame, random
- import cv2, numpy as np, sys
-
- sys.path.append('../api/')
- import hsapi as hs
-
- mode = 2
- # Mode 0 : Webcam mode
- # Mode 1 : Mouse drawing mode
- # Mode 2 : Sungem mode
-
- devices = hs.EnumerateDevices()
- if len(devices) == 0:
- print('No devices found')
- quit()
-
- device = hs.Device(devices[0])
- device.OpenDevice()
-
- graph_file_name = 'graphs/graph_sg'
- from datetime import datetime
- with open(graph_file_name, mode='rb') as f:
- graph_in_memory = f.read()
-
- graph = device.AllocateGraph(graph_in_memory, 0.007843, -1.0)
-
- size = 200
- rz = 28.0
- ratio = rz/size
-
- draw_on = False
- last_pos = (0, 0)
- color = (255, 255, 255)
- radius = 8
-
- fcl2 = open('./misc/class_list.txt','r')
- fcl = open('./misc/class_list_chn.txt','r')
- class_list = fcl.readlines()
- class_list_eng = fcl2.readlines()
- cls = []
-
- for line in class_list:
- cls.append(line.split(' ')[0])
- # Webcam mode
- if mode == 0:
- cap = cv2.VideoCapture(0)
- p1 = 120
- p2 = 45
- ROI_ratio = 0.1
- stage = 0
- while 1:
- ret_val, input_image = cap.read()
- sz = input_image.shape
- cx = int(sz[0]/2)
- cy = int(sz[1]/2)
- ROI = int(sz[0]*ROI_ratio)
- edges = cv2.Canny(input_image,p1,p2)
- edges = cv2.cvtColor(edges,cv2.COLOR_GRAY2RGB)
- print(edges.shape)
- cropped = edges[cx-ROI:cx+ROI,cy-ROI:cy+ROI,:]
-
- kernel = np.ones((4,4),np.uint8)
- cropped = cv2.dilate(cropped,kernel,iterations = 1)
- cropped = cv2.resize(cropped,(28,28))/127.5 - 1
-
- graph.LoadTensor(cropped.astype(np.float16), None)
- output, userobj = graph.GetResult()
-
- output_sort = np.argsort(output)[::-1]
- output_label = output_sort[:5]
- print('*******************')
- chn = ''.join([i for i in cls[stage][:-1] if not i.isdigit()])
- print('Draw %010s %s Stage:[%d]' % (chn, class_list_eng[stage], stage+1))
- print('*******************')
- cnt = 0
- for label in output_label:
- chn = ''.join([i for i in cls[label][:-1] if not i.isdigit()])
- string = '%s %s - %2.2f' % (chn,class_list_eng[label].split(' ')[0],output[label])
- print(string)
- cnt += 1
- if label == stage and output[label] > 0.1:
- print('Congratulations! Stage pass [%d]' % stage)
- stage += 1
-
- cv2.rectangle(input_image, (cy-ROI, cx-ROI), (cy+ROI, cx+ROI),(255,255,0), 5)
- rank = np.where(output_sort == stage)[0]
- string = '%s - Rank: %d' % (class_list_eng[stage].split(' ')[0:-1],rank)
-
- cv2.putText(input_image, string, (30, 30), cv2.FONT_HERSHEY_SIMPLEX, 1, (0, int(255*(1-rank/350.0)), int(255*rank/350.0)), 3)
-
- cv2.imshow('ret',input_image)
- cv2.imshow('ret2',cropped)
- key = cv2.waitKey(1)
- if key == ord('w'):
- p1 += 5
- elif key == ord('s'):
- p1 -= 5
- elif key == ord('e'):
- p2 += 5
- elif key == ord('d'):
- p2 -= 5
- elif key == ord('r'):
- ROI_ratio += 0.1
- elif key == ord('f'):
- ROI_ratio -= 0.1
- print([p1,p2])
-
- elif mode == 1:
- screen = pygame.display.set_mode((size,size))
- def roundline(srf, color, start, end, radius=1):
- pygame.draw.line(srf, color, start, end, radius)
-
- try:
- pts = []
- stage = 0
- while True:
- e = pygame.event.wait()
- if e.type == pygame.QUIT:
- raise StopIteration
- if e.type == pygame.MOUSEBUTTONDOWN:
- draw_on = True
- if e.type == pygame.MOUSEBUTTONUP:
- draw_on = False
- if e.type == pygame.MOUSEMOTION:
- if draw_on:
-
- pts = roundline(screen, color, e.pos, last_pos, radius)
- last_pos = e.pos
- if e.type == pygame.KEYDOWN:
- if e.key == ord('q'):
- screen.fill((0,0,0))
- data = pygame.image.tostring(screen, 'RGB')
- img = np.fromstring(data, np.uint8).reshape(size,size,3)
- img = cv2.resize(img,(28,28)).astype(float)/127.5-1
- graph.LoadTensor(img.astype(np.float16), None)
- output, userobj = graph.GetResult()
- output_label = np.argsort(output)[::-1][:5]
- print('*******************')
- chn = ''.join([i for i in cls[stage][:-1] if not i.isdigit()])
- print('Draw %010s %s Stage:[%d] - Press Q to clear' % (chn, class_list_eng[stage].split(' ')[0], stage+1))
- print('*******************')
- for label in output_label:
- chn = ''.join([i for i in cls[label][:-1] if not i.isdigit()])
- print( '%s %s - %2.2f' % (chn,class_list_eng[label].split(' ')[0],output[label]))
- if label == stage:
- print('Congratulations! Stage pass [%d]' % stage)
- stage += 1
- pygame.display.flip()
-
- except StopIteration:
- pass
-
- pygame.quit()
- elif mode == 2:
- stage = 0
- p1 = 120
- p2 = 45
- ROI_ratio = 0.1
- while 1:
- input_image = graph.GetImage()
- sz = input_image.shape
- output, userobj = graph.GetResult() # 这里的输出目前没用
-
- sz = input_image.shape
- cx = int(sz[0]/2)
- cy = int(sz[1]/2)
- ROI = int(sz[0]*ROI_ratio)
- edges = cv2.Canny(input_image,p1,p2)
- edges = cv2.cvtColor(edges,cv2.COLOR_GRAY2RGB)
- print(edges.shape)
- cropped = edges[cx-ROI:cx+ROI,cy-ROI:cy+ROI,:]
-
- kernel = np.ones((4,4),np.uint8)
- cropped = cv2.dilate(cropped,kernel,iterations = 1)
- cropped = cv2.resize(cropped,(28,28))/127.5 - 1
-
- graph.LoadTensor(cropped.astype(np.float16), None)
- output, userobj = graph.GetResult()
-
- output_sort = np.argsort(output)[::-1]
- output_label = output_sort[:5]
- print('*******************')
- chn = ''.join([i for i in cls[stage][:-1] if not i.isdigit()])
- print('Draw %010s %s Stage:[%d]' % (chn, class_list_eng[stage], stage+1))
- print('*******************')
- cnt = 0
- for label in output_label:
- chn = ''.join([i for i in cls[label][:-1] if not i.isdigit()])
- string = '%s %s - %2.2f' % (chn,class_list_eng[label].split(' ')[0],output[label])
- print(string)
- cnt += 1
- if label == stage and output[label] > 0.1:
- print('Congratulations! Stage pass [%d]' % stage)
- stage += 1
-
- cv2.rectangle(input_image, (cy-ROI, cx-ROI), (cy+ROI, cx+ROI),(255,255,0), 5)
- rank = np.where(output_sort == stage)[0]
- string = '%s - Rank: %d' % (class_list_eng[stage].split(' ')[0:-1],rank)
-
- cv2.putText(input_image, string, (30, 30), cv2.FONT_HERSHEY_SIMPLEX, 1, (0, int(255*(1-rank/350.0)), int(255*rank/350.0)), 3)
-
- cv2.imshow('ret',input_image)
- cv2.imshow('ret2',cropped)
- key = cv2.waitKey(1)
- if key == ord('w'):
- p1 += 5
- elif key == ord('s'):
- p1 -= 5
- elif key == ord('e'):
- p2 += 5
- elif key == ord('d'):
- p2 -= 5
- elif key == ord('r'):
- ROI_ratio += 0.1
- elif key == ord('f'):
- ROI_ratio -= 0.1
- print([p1,p2])
大概就到这里,感谢观看,欢迎批评补充!
---------------------
作者:MS2308
来源:CSDN
|
 /2
/2 
 /2
/2 